Cisco 라우터에서 확장 Access-List 예제
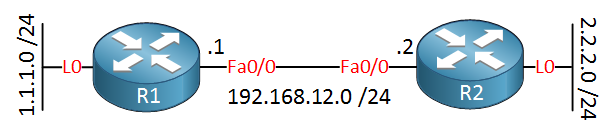
이전 강의에서 표준 access-list를 다뤘습니다. 이제 확장 access-list를 살펴볼 차례입니다. 다음은 우리가 사용할 토폴로지입니다.
확장 access-list를 사용하면 훨씬 더 복잡한 문장을 만들 수 있습니다. 다음과 같은 요구사항이 있다고 가정해 봅시다.
- 1.1.1.0/24 네트워크의 트래픽이 R2의 HTTP 서버에 연결할 수 있지만, IP 주소 2.2.2.2에만 연결할 수 있습니다.
- 다른 모든 트래픽은 거부되어야 합니다.
이를 확장 access-list 문장으로 변환해야 합니다. 기본적으로 다음과 같이 보입니다.
[source] + [source port] to [destination] + [destination port]구성 단계별 설명
함께 구성을 살펴봅시다.
R2(config)# access-list 100 ?
  deny     Specify packets to reject
  dynamic  Specify a DYNAMIC list of PERMITs or DENYs
  permit   Specify packets to forward
  remark   Access list entry comment
먼저 permit 또는 deny를 선택해야 합니다. 또한 remark를 사용할 수도 있습니다. 이를 사용해 access-list 문장에 주석을 추가할 수 있습니다. permit을 선택하겠습니다.
R2(config)# access-list 100 permit ?
  <0-255>  An IP protocol number
  ahp      Authentication Header Protocol
  eigrp    Cisco's EIGRP routing protocol
  esp      Encapsulation Security Payload
  gre      Cisco's GRE tunneling
  icmp     Internet Control Message Protocol
  igmp     Internet Gateway Message Protocol
  ip       Any Internet Protocol
  ipinip   IP in IP tunneling
  nos      KA9Q NOS compatible IP over IP tunneling
  ospf     OSPF routing protocol
  pcp      Payload Compression Protocol
  pim      Protocol Independent Multicast
  tcp      Transmission Control Protocol
  udp      User Datagram Protocol
이제 훨씬 더 많은 옵션이 있습니다. HTTP 트래픽을 허용하는 것을 원하므로 TCP를 선택해야 합니다. 계속해 봅시다.
R2(config)# access-list 100 permit tcp ?
  A.B.C.D  Source address
  any      Any source host
  host     A single source host
이제 소스(source) 를 선택해야 합니다. 와일드카드와 함께 네트워크 주소를 입력하거나 any 또는 host 키워드를 사용할 수 있습니다. 이 두 키워드는 “단축어”입니다. 설명하자면:
- “0.0.0.0 255.255.255.255”를 입력하면 모든 네트워크입니다. 이를 입력하는 대신
any키워드를 사용할 수 있습니다. - “2.2.2.2 0.0.0.0”과 같이 입력하면 단일 IP 주소를 일치시킵니다. “0.0.0.0” 와일드카드를 입력하는 대신
host키워드를 사용할 수 있습니다.
소스로 1.1.1.0/24 네트워크를 선택하고 싶으니 다음과 같이 합니다.
R2(config)# access-list 100 permit tcp 1.1.1.0 0.0.0.255 ?
  A.B.C.D  Destination address
  any      Any destination host
  eq       Match only packets on a given port number
  gt       Match only packets with a greater port number
  host     A single destination host
  lt       Match only packets with a lower port number
  neq      Match only packets not on a given port number
  range    Match only packets in the range of port numbers
소스 외에도 소스 포트 번호도 선택할 수 있습니다. R1에서 R2의 HTTP 서버로 연결할 때 제 소스 포트 번호는 무작위가 될 것이므로 여기서는 소스 포트 번호를 지정하지 않겠습니다.
R2(config)# access-list 100 permit tcp 1.1.1.0 0.0.0.255 host 2.2.2.2 ?
  ack          Match on the ACK bit
  dscp         Match packets with given dscp value
  eq           Match only packets on a given port number
  established  Match established connections
  fin          Match on the FIN bit
  fragments    Check non-initial fragments
  gt           Match only packets with a greater port number
  log          Log matches against this entry
  log-input    Log matches against this entry, including input interface
  lt           Match only packets with a lower port number
  neq          Match only packets not on a given port number
  precedence   Match packets with given precedence value
  psh          Match on the PSH bit
  range        Match only packets in the range of port numbers
  rst          Match on the RST bit
  syn          Match on the SYN bit
  time-range   Specify a time-range
  tos          Match packets with given TOS value
  urg          Match on the URG bit
  <cr>
목적지인 IP 주소 2.2.2.2를 선택합니다. “2.2.2.2 0.0.0.0”으로 입력할 수도 있지만, host 키워드를 사용하는 것이 더 쉽습니다. 목적지 IP 주소 외에도 eq 키워드로 목적지 포트 번호를 선택할 수 있습니다.
R2(config)# access-list 100 permit tcp 1.1.1.0 0.0.0.255 host 2.2.2.2 eq 80이것이 최종 결과입니다. 인터페이스에 적용하기 전에 유용한 추가 문장 하나를 더 추가하겠습니다.
본 강의는 NetworkLessons.com의 미리보기 버전입니다. 전체 내용은 멤버십 가입 후 확인 가능합니다.

포럼 답글

system
안녕 Rene,
빠른 질문이 하나 있습니다. 모든 access-list의 끝에 보이지 않는 deny 명령이 있는데도 왜 다음과 같이 지정해야 하나요?
Router(config)# access-list 100 deny ip any any log설명해 주시면 감사하겠습니다. 추신: 좋은 작업 계속해 주세요.
ReneMolenaar
안녕 Edmundo,
log 키워드를 추가하면 거부된 모든 패킷을 콘솔에 표시합니다. 이는 트러블슈팅, 디버깅 또는 랩 작업에 유용합니다.
system
그러면 제대로 이해했다면, 이 명령을 입력하지 않고도 같은 결과를 얻을 수 있다는 거죠? 그리고 이 명령을 사용하는 유일한 이유는 주로 이벤트 로깅, 트러블슈팅 또는 랩 작업을 위해서라는 거죠? 맞나요?
감사합니다.
ReneMolenaar
네 맞습니다. 항상 맨 아래에 기본 deny any가 있습니다. Cisco IOS 라우터에서 한번 시도해 보세요…
system
와… 정말 도움이 됩니다.. 너무 감사합니다.. 좋은 작업 계속해 주세요!
76개의 추가 답글이 있습니다. 커뮤니티 포럼을 방문해 질문하거나 토론에 참여하세요.
출처: networklessons.com - Extended Access-List example on Cisco Router
태그: ACL, Security