OSPF 기본 설정 (Basic OSPF Configuration)
목차
- 핵심 요약
- 사전 지식
- 설정
- 3.1. Router ID
- 3.2. 네이버 인접 관계
- 3.3. 메트릭
- 3.4. 최적 경로 선택
- 3.5. Cost 조작
- 3.6. 루프백 인터페이스 광고
- 3.7. 기본 네트워크
- 3.8. 인증
- 3.8.1. 평문 인증
- 3.8.2. MD5 인증
- 3.9. Hello 및 Dead 인터벌
- 결론
OSPF(Open Shortest Path First)는 router ospf 명령어와 네트워크 구문을 사용하여 설정합니다. 네트워크 구문은 어떤 인터페이스가 OSPF에 참여하고, 각각 어떤 영역에 속하는지를 지정합니다. 이 강의에서는 Router ID 설정, Cost 계산, 인증, 기본 경로 광고 등의 예제를 통해 싱글 에어리어 OSPF 설정 방법을 설명합니다.
1. 핵심 요약
- OSPF는 network 구문에서 일반 서브넷 마스크가 아닌 와일드카드 마스크(역 서브넷 마스크)를 사용합니다.
- Router ID는 가장 높은 루프백 IP 주소에서 선택되며, 루프백이 없으면 가장 높은 활성 인터페이스 IP 주소에서 선택됩니다.
- OSPF는 인터페이스 대역폭을 기반으로 하는 Cost를 메트릭으로 사용합니다.
- 인증은 평문(Plaintext) 또는 MD5(Message Digest 5)로 설정할 수 있으며, 인터페이스 단위 또는 영역 단위로 적용 가능합니다.
show ip ospf neighbor명령어로 네이버 인접 관계를 확인할 수 있습니다.- 루프백 인터페이스는 안정적인 Router ID를 제공하며, 물리 인터페이스처럼 광고할 수 있습니다.
- 기본 경로는
default-information originate always명령어로 광고합니다.
2. 사전 지식
이 OSPF 설정 강의를 따라하려면 OSPF의 기본 개념을 이해하고 있어야 합니다. Introduction to OSPF 강의를 먼저 읽어보세요.
3. 설정
설정을 시작하겠습니다. 사용할 토폴로지는 다음과 같습니다:
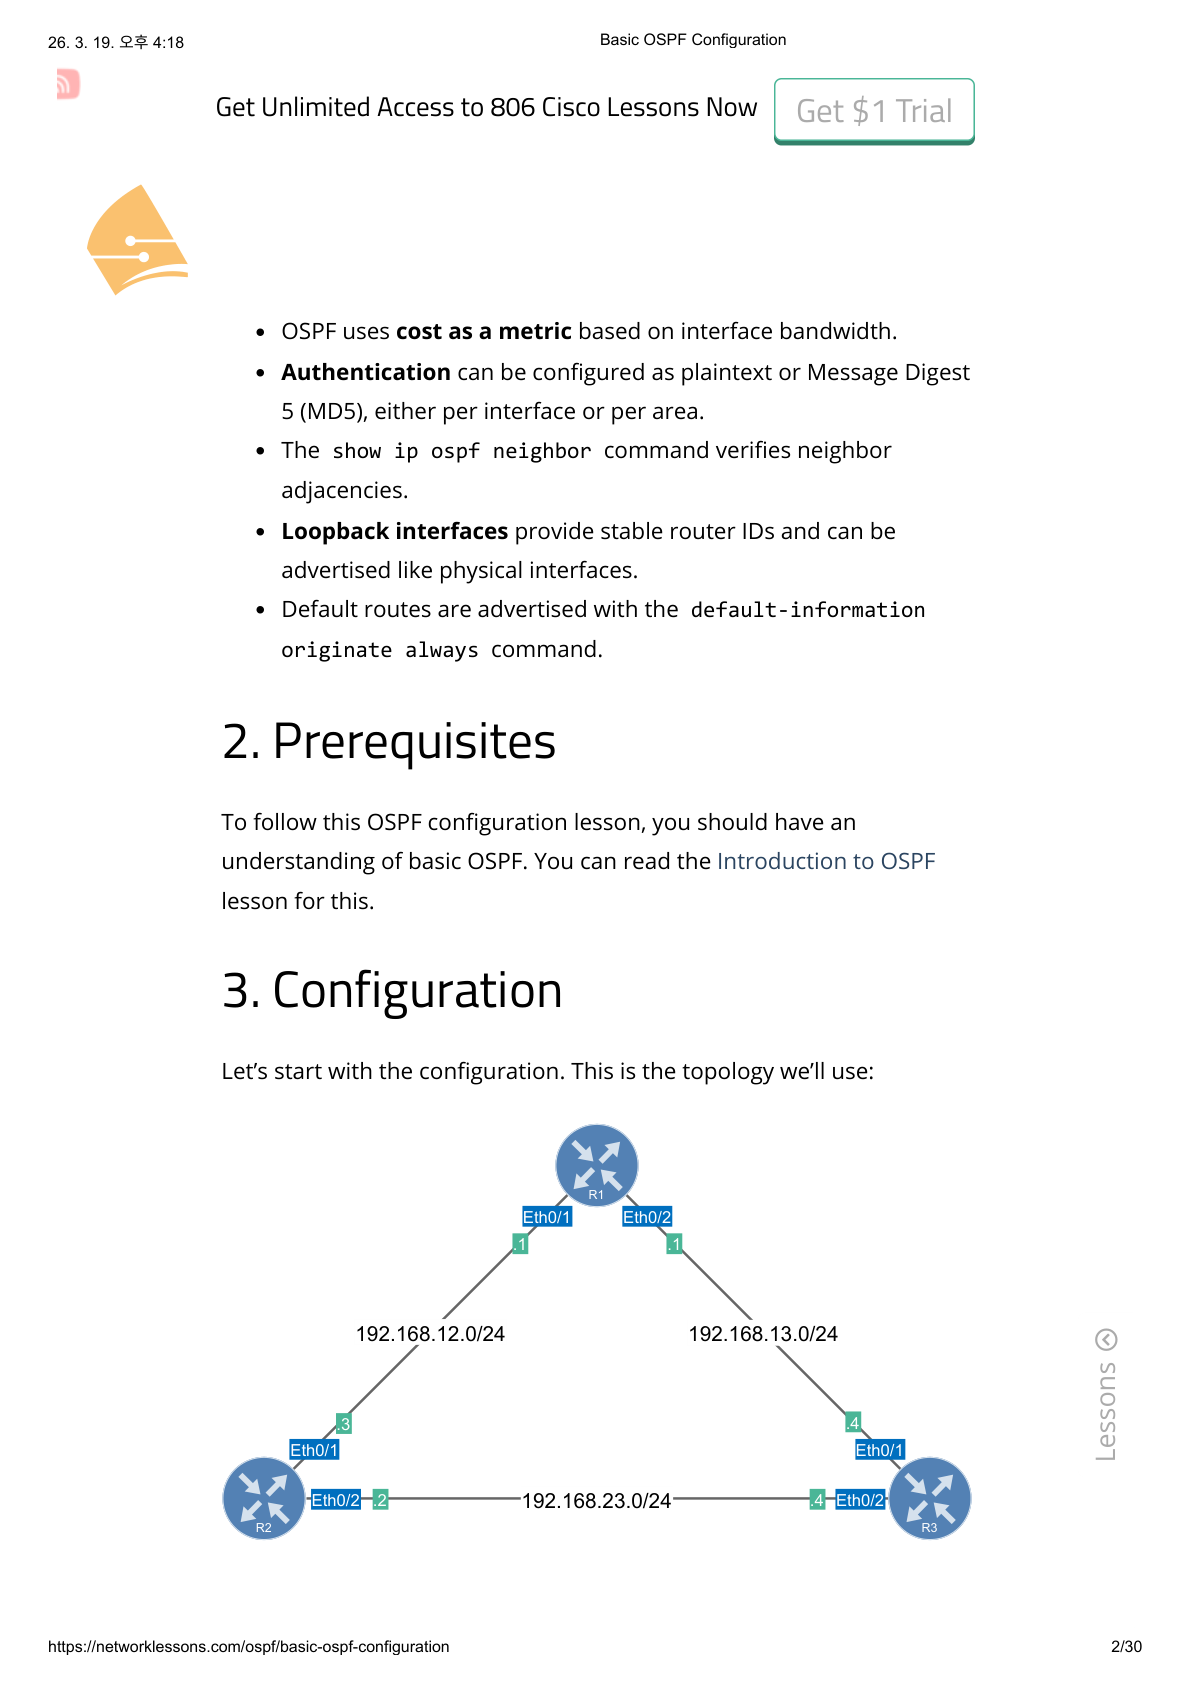
3대의 라우터가 삼각형으로 연결되어 있습니다. 모든 라우터는 OSPF Area 0에 속합니다.
- R1: Eth0/1 (.1) → 192.168.12.0/24, Eth0/2 (.1) → 192.168.13.0/24
- R2: Eth0/1 (.2) → 192.168.12.0/24, Eth0/2 (.2) → 192.168.23.0/24
- R3: Eth0/1 (.3) → 192.168.13.0/24, Eth0/2 (.3) → 192.168.23.0/24
초기 설정
각 장비의 초기 설정입니다.
R1
hostname R1
!
interface Ethernet0/1
 ip address 192.168.12.1 255.255.255.0
 no shutdown
!
interface Ethernet0/2
 ip address 192.168.13.1 255.255.255.0
 no shutdown
!
end
R2
hostname R2
!
interface Ethernet0/1
 ip address 192.168.12.2 255.255.255.0
 no shutdown
!
interface Ethernet0/2
 ip address 192.168.23.2 255.255.255.0
 no shutdown
!
end
R3
hostname R3
!
interface Ethernet0/1
 ip address 192.168.13.3 255.255.255.0
 no shutdown
!
interface Ethernet0/2
 ip address 192.168.23.3 255.255.255.0
 no shutdown
!
end
3.1. Router ID
모든 라우터에서 OSPF 프로세스를 활성화하고, 각각 Router ID를 수동으로 설정합니다:
R1(config)# router ospf 1
R1(config-router)# router-id 1.1.1.1

R2(config)# router ospf 1
R2(config-router)# router-id 2.2.2.2

R3(config)# router ospf 1
R3(config-router)# router-id 3.3.3.3
router ospf 명령어로 프로세스를 시작하고, router-id 명령어로 각 라우터의 고유 ID를 설정합니다.
Router ID를 지정하지 않으면, OSPF는 루프백 인터페이스 중 가장 높은 IP 주소를 선택합니다. 루프백 인터페이스가 없으면 물리 인터페이스 중 가장 높은 IP 주소를 선택합니다. 한번 선택된 Router ID는 OSPF 프로세스를 리셋하기 전까지 변경되지 않습니다.
숫자 “1”은 프로세스 ID이며, 원하는 숫자를 사용할 수 있습니다. 각 라우터에서 다른 번호를 사용해도 상관없습니다.
3.2. 네이버 인접 관계 (Neighbor Adjacencies)
이제 네이버 인접 관계를 수립합니다. R1과 R2부터 시작하겠습니다:
R1(config)# router ospf 1
R1(config-router)# network 192.168.12.0 0.0.0.255 area 0

R2(config)# router ospf 1
R2(config-router)# network 192.168.12.0 0.0.0.255 area 0
두 번째 단계는 network 명령어를 사용하는 것입니다. 하나씩 살펴보겠습니다:
network 192.168.12.0 0.0.0.255
network 명령어는 두 가지 역할을 합니다:
- 이 범위에 해당하는 네트워크를 OSPF에서 광고합니다.
- 이 범위에 해당하는 인터페이스에서 OSPF를 활성화합니다. 즉, OSPF가 해당 인터페이스에서 Hello 패킷을 전송합니다.
192.168.12.0 뒤에 0.0.0.255가 보입니다. 이것은 서브넷 마스크가 아니라 와일드카드 마스크입니다. 와일드카드 마스크는 역 서브넷 마스크입니다. 예를 들어보겠습니다:
| 옥텟 1 | 옥텟 2 | 옥텟 3 | 옥텟 4 | |
|---|---|---|---|---|
| 서브넷 마스크 | 255 | 255 | 255 | 0 |
| (이진수) | 11111111 | 11111111 | 11111111 | 00000000 |
| 와일드카드 마스크 | 0 | 0 | 0 | 255 |
| (이진수) | 00000000 | 00000000 | 00000000 | 11111111 |
역 서브넷 마스크란, 와일드카드 마스크의 이진수 1과 0이 서브넷 마스크와 반대로 뒤집혀 있다는 의미입니다. 서브넷 마스크 255.255.255.0은 와일드카드 마스크 0.0.0.255와 같습니다. 와일드카드 마스크에 대해서는 ACL(액세스 리스트) 강의에서 더 자세히 설명하겠습니다!
OSPF는 영역을 사용하므로, 영역을 지정해야 합니다:
area 0
이 예제에서는 싱글 에어리어 OSPF를 설정했습니다. 모든 라우터가 Area 0에 속합니다.
network 명령어를 입력하면 콘솔에 다음 메시지가 표시됩니다:
R1# %OSPF-5-ADJCHG: Process 1, Nbr 2.2.2.2 on Ethernet0/1
from LOADING to FULL, Loading Done

R2# %OSPF-5-ADJCHG: Process 1, Nbr 1.1.1.1 on Ethernet0/1
from LOADING to FULL, Loading Done
R1과 R2가 네이버가 된 것 같습니다. 네이버가 되었는지 확인할 수 있는 명령어가 있습니다:
R1# show ip ospf neighbor

Neighbor ID     Pri   State           Dead Time   Address         Interface
2.2.2.2           1   FULL/DR         00:00:34    192.168.12.2    Ethernet0/1
R2# show ip ospf neighbor
Neighbor ID Pri State Dead Time Address Interface
1.1.1.1 1 FULL/BDR 00:00:37 192.168.12.1 Ethernet0/1show ip ospf neighbor는 라우터에 OSPF 네이버가 있는지 확인하는 유용한 명령어입니다. 상태가 FULL이면 라우터들이 성공적으로 네이버가 된 것입니다.
DR(Designated Router) 과 BDR(Backup Designated Router) 은 여러 라우터가 직접 통신할 수 있는 멀티 액세스 세그먼트에서 라우팅 정보 배포를 담당하는 라우터를 결정합니다.
각 OSPF 라우터는 Router ID를 가지며, show ip protocols 명령어로 확인할 수 있습니다:
R1# show ip protocols

Routing Protocol is "ospf 1"
  Outgoing update filter list for all interfaces is not set
  Incoming update filter list for all interfaces is not set
  Router ID 1.1.1.1
  Number of areas in this router is 1. 1 normal 0 stub 0 nssa
  Maximum path: 4
  Routing for Networks:
    192.168.12.0 0.0.0.255 area 0
  Distance: (default is 110)
Router ID만 확인하려면 필터링할 수 있습니다:
R2# show ip protocols | include ID
  Router ID 2.2.2.2
현재 R1과 R2 사이에 OSPF 네이버 인접 관계가 있습니다. R1-R3, R2-R3도 OSPF 네이버가 되도록 설정하겠습니다:
R1(config)# router ospf 1
R1(config-router)# network 192.168.13.0 0.0.0.255 area 0

R2(config)# router ospf 1
R2(config-router)# network 192.168.23.0 0.0.0.255 area 0

R3(config)# router ospf 1
R3(config-router)# network 192.168.13.0 0.0.0.255 area 0
R3(config-router)# network 192.168.23.0 0.0.0.255 area 0
모든 네트워크를 OSPF에 광고합니다. 라우팅 테이블을 확인하기 전에, 라우터들이 OSPF 네이버가 되었는지 확인합니다:
R1# show ip ospf neighbor

Neighbor ID     Pri   State           Dead Time   Address         Interface
3.3.3.3           1   FULL/DR         00:00:38    192.168.13.3    Ethernet0/2
2.2.2.2           1   FULL/BDR        00:00:39    192.168.12.2    Ethernet0/1
R2# show ip ospf neighbor
Neighbor ID Pri State Dead Time Address Interface
3.3.3.3 1 FULL/DR 00:00:31 192.168.23.3 Ethernet0/2
1.1.1.1 1 FULL/DR 00:00:35 192.168.12.1 Ethernet0/1R3# show ip ospf neighbor
Neighbor ID Pri State Dead Time Address Interface
2.2.2.2 1 FULL/BDR 00:00:31 192.168.23.2 Ethernet0/2
1.1.1.1 1 FULL/BDR 00:00:37 192.168.13.1 Ethernet0/1라우터들이 OSPF 네이버가 되었고, 상태가 FULL이므로 정보 교환이 완료되었습니다.
3.3. 메트릭 (Metrics)
라우팅 테이블을 확인해 보겠습니다:
R1# show ip route ospf

O     192.168.23.0/24 [110/20] via 192.168.13.3, 00:00:53, Ethernet0/2
                      [110/20] via 192.168.12.2, 00:00:53, Ethernet0/1
출력 내용을 설명합니다:
- “O” 는 OSPF를 의미합니다. 이 항목은 OSPF를 통해 학습한 경로입니다.
- 192.168.23.0/24 는 학습한 네트워크입니다. R2와 R3 사이의 링크입니다.
- “110” 은 OSPF의 Administrative Distance(관리 거리)입니다. 라우터가 동일한 네트워크를 여러 소스에서 학습했을 때 우선순위를 결정합니다.
- “20” 은 메트릭입니다. OSPF는 Cost를 메트릭으로 사용합니다. 이 네트워크에 도달하기 위한 총 Cost가 20입니다.
- “via” 는 트래픽을 보낼 넥스트 홉 IP 주소입니다.
R2와 R3을 통한 총 메트릭(Cost)이 동일하므로, R1은 192.168.23.0/24에 도달하기 위한 경로 2개를 모두 설치합니다.
R2와 R3의 라우팅 테이블:
R2# show ip route ospf

O     192.168.13.0/24 [110/20] via 192.168.23.3, 00:01:03, Ethernet0/2
                      [110/20] via 192.168.12.1, 00:01:03, Ethernet0/1
R3# show ip route ospf
O 192.168.12.0/24 [110/20] via 192.168.23.2, 00:01:12, Ethernet0/2
[110/20] via 192.168.13.1, 00:01:12, Ethernet0/1총 메트릭 20은 어떻게 계산된 것일까요? 인터페이스를 확인해 보겠습니다:
R1# show ip ospf interface Ethernet0/1

Ethernet0/1 is up, line protocol is up
  Internet Address 192.168.12.1/24, Interface ID 3, Area 0
  Attached via Network Statement
  Process ID 1, Router ID 1.1.1.1, Network Type BROADCAST, Cost: 10
  Transmit Delay is 1 sec, State DR, Priority 1
  Designated Router (ID) 1.1.1.1, Interface address 192.168.12.1
  Backup Designated router (ID) 2.2.2.2, Interface address 192.168.12.2
  Timer intervals configured, Hello 10, Dead 40, Wait 40, Retransmit 5
  Neighbor Count is 1, Adjacent neighbor count is 1
    Adjacent with neighbor 2.2.2.2  (Backup Designated Router)
show ip ospf interface 명령어로 특정 인터페이스의 Cost를 확인할 수 있습니다. 이 인터페이스의 Cost는 10입니다.
Cost는 기본적으로 100Mbps인 참조 대역폭(Reference Bandwidth)을 기반으로 계산됩니다. OSPF는 이더넷(10Mbit) 인터페이스에 Cost 10을 할당합니다.
3.4. 최적 경로 선택 (Best Path Selection)
인터페이스를 셧다운하면 어떻게 되는지 살펴보겠습니다. 예를 들어 R1과 R2 사이의 링크:
R1(config)# interface Ethernet0/1
R1(config-if)# shutdown
가장 먼저 R1과 R2의 네이버 인접 관계가 끊어집니다:
R1#
%OSPF-5-ADJCHG: Process 1, Nbr 2.2.2.2 on Ethernet0/1
from FULL to DOWN, Neighbor Down: Interface down or detached
R1은 인터페이스가 다운된 것을 알고 있으므로 즉시 표시됩니다. R2는 Dead 타이머가 만료될 때까지 기다린 후 R1을 다운으로 선언합니다:
R2#
*%OSPF-5-ADJCHG: Process 1, Nbr 1.1.1.1 on Ethernet0/1
from FULL to DOWN, Neighbor Down: Dead timer expired
경로를 확인해 보겠습니다:
R1# show ip route ospf

O     192.168.12.0/24 [110/30] via 192.168.13.3, 00:01:01, Ethernet0/2
O     192.168.23.0/24 [110/20] via 192.168.13.3, 00:07:12, Ethernet0/2
R1은 이제 R3을 통해 다른 두 네트워크에 도달합니다. 192.168.12.0/24의 총 메트릭은 R3과 R2를 거쳐야 하므로 30이 되었습니다.
R2의 경로:
R2# show ip route ospf

O     192.168.13.0/24 [110/20] via 192.168.23.3, 00:07:35, Ethernet0/2
R3의 경로:
R3# show ip route ospf

O     192.168.12.0/24 [110/20] via 192.168.23.2, 00:01:48, Ethernet0/2
인터페이스가 다운되면 OSPF가 자동으로 최단 경로를 재계산합니다.
계속하기 전에 링크를 복구합니다:
R1(config)# interface Ethernet0/1
R1(config-if)# no shutdown
3.5. Cost 조작 (Cost Manipulation)
인터페이스를 셧다운하지 않고 OSPF가 특정 이더넷 인터페이스를 사용하도록 강제하려면 어떻게 해야 할까요? Cost를 수동으로 변경할 수 있습니다:
R2(config)# interface Ethernet0/1
R2(config-if)# ip ospf cost 100
확인합니다:
R2# show ip ospf interface Ethernet0/1 | include Cost
  Process ID 1, Router ID 2.2.2.2, Network Type BROADCAST, Cost: 100
ip ospf cost 명령어로 Cost를 변경합니다. 100으로 설정하면 이 링크는 덜 매력적인 경로가 됩니다:
R2# show ip route ospf

O     192.168.13.0/24 [110/20] via 192.168.23.3, 00:10:29, Ethernet0/2
R2는 이제 192.168.13.0/24 네트워크에 도달하기 위해 R3을 통한 링크만 선호합니다. 이것이 최단 경로입니다.
Cost를 줄여서 링크를 더 매력적으로 만들 수도 있습니다. 현재 R1의 상태:
R1# show ip route ospf

O     192.168.23.0/24 [110/20] via 192.168.13.3, 00:12:23, Ethernet0/2
                      [110/20] via 192.168.12.2, 00:00:13, Ethernet0/1
R1은 두 링크를 모두 사용합니다. R1에서 R3으로의 링크 Cost를 변경합니다:
R1(config)# interface Ethernet0/2
R1(config-if)# ip ospf cost 1
변경 확인:
R1# show ip ospf interface Ethernet0/2 | include Cost
  Process ID 1, Router ID 1.1.1.1, Network Type BROADCAST, Cost: 1
두 링크를 모두 사용하는 대신, R1은 이제 최단 경로를 사용합니다:
R1# show ip route ospf

O     192.168.23.0/24 [110/11] via 192.168.13.3, 00:00:22, Ethernet0/2
이 경로의 총 메트릭은 11 (10+1)이므로 최단 경로입니다.
3.6. 루프백 인터페이스 광고 (Advertise Loopback Interface)
다른 것을 광고해 볼까요? 루프백 인터페이스를 생성하고 OSPF에서 광고할 수 있습니다:
R1(config)# interface Loopback 0
R1(config-if)# ip address 1.1.1.1 255.255.255.0
루프백을 생성했습니다. 광고합니다:
R1(config)# router ospf 1
R1(config-router)# network 1.1.1.1 0.0.0.0 area 0
R2와 R3이 루프백에 도달하는 경로를 학습합니다:
R2# show ip route ospf

      1.0.0.0/32 is subnetted, 1 subnets
O        1.1.1.1 [110/21] via 192.168.23.3, 00:00:52, Ethernet0/2
O     192.168.13.0/24 [110/20] via 192.168.23.3, 00:16:50, Ethernet0/2
R2의 총 메트릭은 21입니다. R3(메트릭 10)을 거쳐, R1-R3 링크(메트릭 10)를 지나고, 루프백 인터페이스(메트릭 1)에 도달합니다.
R3의 경우:
R3# show ip route ospf

      1.0.0.0/32 is subnetted, 1 subnets
O        1.1.1.1 [110/11] via 192.168.13.1, 00:01:07, Ethernet0/1
O     192.168.12.0/24 [110/20] via 192.168.13.1, 00:04:55, Ethernet0/1
R3의 총 메트릭은 11입니다. R1으로의 직접 링크(메트릭 10)를 사용하고 루프백(메트릭 1)에 도달합니다.
루프백 인터페이스의 장점은 일반 인터페이스처럼 도달 가능하다는 것입니다:
R2# ping 1.1.1.1

Type escape sequence to abort.
Sending 5, 100-byte ICMP Echos to 1.1.1.1, timeout is 2 seconds:
!!!!!
Success rate is 100 percent (5/5), round-trip min/avg/max = 1/1/1 ms
루프백 인터페이스는 실제 네트워크에서 더 많은 용도가 있지만, 랩 환경에서는 라우팅 프로토콜에 네트워크를 빠르게 광고하는 데 유용합니다.
3.7. 기본 네트워크 (Default Network)
OSPF에 기본 경로(Default Route)를 광고할 수도 있습니다. 라우터가 인터넷에 연결되어 있고 이를 다른 라우터에게 알리고 싶을 때 유용합니다:
R2(config)# router ospf 1
R2(config-router)# default-information originate always
default-information originate 명령어를 사용합니다. 라우팅 테이블에 기본 경로가 아직 없다면 always 키워드를 추가해야 합니다.
기본 경로가 광고되었는지 확인합니다:
R1# show ip route ospf | include 0.0.0.0
Gateway of last resort is 192.168.12.2 to network 0.0.0.0
O*E2  0.0.0.0/0 [110/1] via 192.168.12.2, 00:00:15, Ethernet0/1
R3# show ip route ospf | include 0.0.0.0
Gateway of last resort is 192.168.23.2 to network 0.0.0.0
O*E2 0.0.0.0/0 [110/1] via 192.168.23.2, 00:00:34, Ethernet0/2R1과 R3이 R2로부터 기본 경로를 학습한 것을 확인할 수 있습니다.
3.8. 인증 (Authentication)
OSPF 설정을 계속하겠습니다. 평문 인증과 MD5 인증 방법을 보여드리겠습니다.
3.8.1. 평문 인증 (Plaintext)
R2와 R3 사이에 평문 인증을 설정합니다:
R2(config)# interface Ethernet0/2
R2(config-if)# ip ospf authentication
R2(config-if)# ip ospf authentication-key MY_PASS

R3(config)# interface Ethernet0/2
R3(config-if)# ip ospf authentication
R3(config-if)# ip ospf authentication-key MY_PASS
먼저 ip ospf authentication 명령어로 인터페이스에서 평문 인증을 활성화합니다. 그 다음 ip ospf authentication-key 명령어로 패스워드를 설정합니다.
한쪽 라우터에서 인증을 설정하면, 다른 쪽을 설정할 때까지 잠시 네이버 인접 관계가 끊어집니다.
인증이 활성화되었는지 확인하는 유용한 디버그 명령어가 있습니다:
R2# debug ip ospf packet
OSPF packet debugging is on
출력:
R2#
OSPF-1 PAK  : Et0/2:  IN: 192.168.23.3->224.0.0.5: ver:2
type:1 len:48 rid:3.3.3.3 area:0.0.0.0 chksum:3339 auth:1
OSPF-1 PAK  : Et0/1: OUT: 192.168.12.2->224.0.0.5: ver:2
type:1 len:48 rid:2.2.2.2 area:0.0.0.0 chksum:4D40 auth:0
OSPF-1 PAK  : Et0/1:  IN: 192.168.12.1->224.0.0.5: ver:2
type:1 len:48 rid:1.1.1.1 area:0.0.0.0 chksum:4D40 auth:0
OSPF-1 PAK  : Et0/2: OUT: 192.168.23.2->224.0.0.5: ver:2
type:1 len:48 rid:2.2.2.2 area:0.0.0.0 chksum:3339 auth:1
Ethernet0/1과 Ethernet0/2 양쪽 인터페이스에서 인바운드(IN)와 아웃바운드(OUT) 패킷을 볼 수 있습니다.
- auth:0 — 이 패킷은 인증되지 않았습니다. R1과 R2 사이에는 인증을 설정하지 않았으므로 정상입니다.
- auth:1 — R2와 R3 사이의 패킷으로, 평문 인증이 활성화되었음을 의미합니다.
디버그를 비활성화합니다:
R2# no debug all
All possible debugging has been turned off
3.8.2. MD5 인증 (MD5 Authentication)
R1과 R2 사이에 MD5 인증을 설정합니다:
R1(config)# interface Ethernet 0/1
R1(config-if)# ip ospf authentication message-digest
R1(config-if)# ip ospf message-digest-key 1 md5 MY_KEY

R2(config)# interface Ethernet 0/1
R2(config-if)# ip ospf authentication message-digest
R2(config-if)# ip ospf message-digest-key 1 md5 MY_KEY
먼저 ip ospf authentication message-digest 명령어로 OSPF에 MD5를 사용하도록 지시합니다. 그 다음 ip ospf message-digest-key 명령어로 MD5 키 1번(양쪽 라우터에서 같은 번호를 사용해야 함)과 패스워드 “MY_KEY”를 설정합니다.
디버그로 동작을 확인합니다:
R1# debug ip ospf packet
OSPF packet debugging is on
R1#
OSPF-1 PAK : Et0/1: IN: 192.168.12.2->224.0.0.5: ver:2
type:1 len:48 rid:2.2.2.2 area:0.0.0.0 chksum:0 auth:2
keyid:1 seq:0x6986
OSPF-1 PAK : Et0/1: OUT: 192.168.12.1->224.0.0.5: ver:2
type:1 len:48 rid:1.1.1.1 area:0.0.0.0 chksum:0 auth:2
keyid:1 seq:0x6986출력에서 auth:2는 MD5 인증을 의미합니다. 키 ID도 확인할 수 있습니다.
위 예제에서는 인터페이스별로 인증을 활성화했습니다. 전체 영역에 대해서도 활성화할 수 있습니다. 평문 인증은
area 0 authentication명령어를, MD5 인증은area 0 authentication message-digest명령어를 사용합니다. 키는 여전히 인터페이스에서 설정해야 합니다.
3.9. Hello 및 Dead 인터벌 (Hello and Dead Interval)
OSPF 타이머를 변경하여 네트워크 변화에 더 빠르게 반응하도록 할 수 있습니다. 이더넷 인터페이스의 기본값:
R1# show ip ospf interface Ethernet 0/1

Ethernet0/1 is up, line protocol is up
  Internet Address 192.168.12.1/24, Interface ID 3, Area 0
  Process ID 1, Router ID 1.1.1.1, Network Type BROADCAST, Cost: 10
  Transmit Delay is 1 sec, State BDR, Priority 1
  Designated Router (ID) 2.2.2.2, Interface address 192.168.12.2
  Backup Designated router (ID) 1.1.1.1, Interface address 192.168.12.1
  Timer intervals configured, Hello 10, Dead 40, Wait 40, Retransmit 5
기본 타이머: 10초마다 Hello 패킷을 전송하고, 40초 동안 Hello 패킷을 수신하지 못하면 네이버를 “dead”로 선언합니다.
타이머를 변경합니다. R1과 R2 사이에서:
R1(config-if)# interface Ethernet 0/1
R1(config-if)# ip ospf hello-interval 5
R1(config-if)# ip ospf dead-interval 15

R2(config)# interface Ethernet0/1
R2(config-if)# ip ospf hello-interval 5
R2(config-if)# ip ospf dead-interval 15
ip ospf hello-interval과 ip ospf dead-interval 명령어로 타이머를 변경합니다. 이제 Hello 패킷은 5초마다 전송되고, 15초 동안 네이버로부터 응답이 없으면 상대방을 dead로 선언합니다.
최종 설정 (Final Configurations)
R1
hostname R1
!
interface Loopback0
 ip address 1.1.1.1 255.255.255.0
!
interface Ethernet0/1
 ip address 192.168.12.1 255.255.255.0
 ip ospf authentication message-digest
 ip ospf message-digest-key 1 md5 MY_KEY
 ip ospf dead-interval 15
 ip ospf hello-interval 5
!
interface Ethernet0/2
 ip address 192.168.13.1 255.255.255.0
 ip ospf cost 1
!
router ospf 1
 router-id 1.1.1.1
 network 1.1.1.1 0.0.0.0 area 0
 network 192.168.12.0 0.0.0.255 area 0
 network 192.168.13.0 0.0.0.255 area 0
!
end
R2
hostname R2
!
interface Ethernet0/1
 ip address 192.168.12.2 255.255.255.0
 ip ospf authentication message-digest
 ip ospf message-digest-key 1 md5 MY_KEY
 ip ospf dead-interval 15
 ip ospf hello-interval 5
 ip ospf cost 100
!
interface Ethernet0/2
 ip address 192.168.23.2 255.255.255.0
 ip ospf authentication
 ip ospf authentication-key MY_PASS
!
router ospf 1
 router-id 2.2.2.2
 network 192.168.12.0 0.0.0.255 area 0
 network 192.168.23.0 0.0.0.255 area 0
 default-information originate always
!
end
R3
hostname R3
!
interface Ethernet0/1
 ip address 192.168.13.3 255.255.255.0
!
interface Ethernet0/2
 ip address 192.168.23.3 255.255.255.0
 ip ospf authentication
 ip ospf authentication-key MY_PASS
!
router ospf 1
 router-id 3.3.3.3
 network 192.168.13.0 0.0.0.255 area 0
 network 192.168.23.0 0.0.0.255 area 0
!
end
4. 결론
싱글 에어리어 OSPF를 Cisco IOS 라우터에서 설정하는 방법을 배웠습니다:
router ospf로 OSPF 프로세스를 시작하고 Router ID를 수동으로 설정하는 방법- OSPF에서 네트워크를 광고하는 방법
- OSPF가 Cost를 계산하고 최단 경로를 선택하는 방법
- 평문 또는 MD5 인증으로 OSPF를 인증하는 방법
- Hello 및 Dead 인터벌을 변경하는 방법
더 알고 싶다면 멀티 에어리어 OSPF 설정 강의를 확인하세요.
Tags: OSPF, Router ID, Cost, Authentication, MD5, Hello Interval, Dead Interval, Loopback